Flsun v400: Difference between revisions
More actions
NCMReynolds (talk | contribs) Add link to Klipper interface |
|||
| (7 intermediate revisions by 3 users not shown) | |||
| Line 5: | Line 5: | ||
The project was funded from the sale of donated v1.2 Raspberry PIs to the hacker community! | The project was funded from the sale of donated v1.2 Raspberry PIs to the hacker community! | ||
The v400 is | The v400 is has an enclosure & fire puck to allow unattended printing and HEPA/Active Carbon filter for indoor ASA/ABS printing | ||
Its maximum off the shelf print speed is 400mm/s, | Its maximum off the shelf print speed is 400mm/s, and whilst it will achieve this speed, it performs best on simple models with long sections. | ||
It has a maximum print diameter of 300mm and can print | It has a maximum print diameter of 300mm and can print up to 410mm high, but be aware delta printers perform poorly at their maximum height range and suffer from a coning effect which means it's not a complete cylinder at the highest point. | ||
'''Induction is mandatory for this printer, not because it is not simple to use, but because customisations must be made to your printer profile to enable the modified fans to purge the print area when using known cancer causing materials to keep you and other space members safe. | '''Induction is mandatory for this printer, not because it is not simple to use, but because customisations must be made to your printer profile to enable the modified fans to purge the print area when using known cancer-causing materials to keep you and other space members safe. | ||
''' If you are using the PC in the print lab and are not changing settings, this is the | ''' If you are using the PC in the print lab and are not changing settings, this is the simplest option! | ||
For complex prints, it is recommended to reduce the stock speed acceleration to | For complex prints, it is recommended to reduce the stock speed acceleration to 6000mm/s and the max print speed to 350mm/s. This usually only increases long complex print speeds by a matter of minutes. Anything with simple designs will be fine at this speed. | ||
==Changing the time== | ==Changing the time== | ||
| Line 24: | Line 24: | ||
You must not just use the off switch to turn off the printer. | You must not just use the off switch to turn off the printer. | ||
From the home screen, press configuration > system > shutdown > confirm. | From the home screen, press configuration > system > system shutdown > confirm. | ||
[[File:Packaged all updated v400.jpg|200px|thumb|none]] | |||
[[File: | |||
When the screen has gone black, give it 30 seconds then switch off the main switch on the left of the machine behind the base of the front left column where the plug enters the printer. | |||
==Emergency Stop== | |||
The v400 has an emergency stop 'button' on the display which will stop it suddenly and kill Klipper. You can use this to stop the printer quickly if you spot a serious problem. It is not an 'error message' Nick. | |||
[[File:EmergencyStop v400.jpg|200px|thumb|none]] | |||
==Klipper Interface== | |||
You can upload GCODE files to the printer using the [http://172.28.10.66/ Klipper Interface] from a machine connected to the Hackspace network. | |||
==Maintainers== | ==Maintainers== | ||
| Line 124: | Line 121: | ||
The speeder pad runs FLSun forked firmware. Please do not "upgrade" this to official Klipper as this will require more changes in the slicer settings related to reading stored autolevelling mesh. | The speeder pad runs FLSun forked firmware. Please do not "upgrade" this to official Klipper as this will require more changes in the slicer settings related to reading stored autolevelling mesh. | ||
==Restoring Dirty/Invalid packages== | |||
Goto Configuration > system to check the packages on the speeder pad. | |||
[[File:Invalid package v400.jpg|200px|thumb|none]] | |||
If you click on the Dirty or Invalid packages, recover "soft" first. | |||
[[File:Invalid Package Recovery v400.jpg|200px|thumb|none]] | |||
The pad will show a config screen with a "finish" button in the corner - ignore this and do not press it. The text may scroll for some time. | |||
[[File:Package update v400.jpg|200px|thumb|none]] | |||
[[File:Packaged all updated v400.jpg|200px|thumb|none]] | |||
When it is complete, it will return to the home screen. | |||
==Profiles== | |||
Known good profiles, tested on Cura (5.2.1) | |||
PETG: https://drive.google.com/file/d/17MrZKO8HQ9m1hasTZspd3uB7yUJjxcOJ/view?usp=sharing | |||
PLA: https://drive.google.com/file/d/1vvfEeXpEavoDVzoWUcETAlr1yxPsmVb-/view?usp=share_link | |||
TPU: https://drive.google.com/file/d/1KaKYprFIrm2kWPjQyJVNFyV1FO2kh9o0/view?usp=sharing | |||
Latest revision as of 11:04, 10 October 2023
Flsun v400
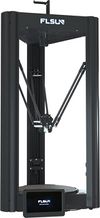
The Flsun v400 is a delta printer controlled by the speederpad. It was purchased on the 1st March 23 as part of the policy on the hackspace policy of providing "better" machines than people have access for at home. The printer enables fast printing, enabling large complex prints to be completed under 24 hours.
The project was funded from the sale of donated v1.2 Raspberry PIs to the hacker community!
The v400 is has an enclosure & fire puck to allow unattended printing and HEPA/Active Carbon filter for indoor ASA/ABS printing
Its maximum off the shelf print speed is 400mm/s, and whilst it will achieve this speed, it performs best on simple models with long sections.
It has a maximum print diameter of 300mm and can print up to 410mm high, but be aware delta printers perform poorly at their maximum height range and suffer from a coning effect which means it's not a complete cylinder at the highest point.
Induction is mandatory for this printer, not because it is not simple to use, but because customisations must be made to your printer profile to enable the modified fans to purge the print area when using known cancer-causing materials to keep you and other space members safe. If you are using the PC in the print lab and are not changing settings, this is the simplest option!
For complex prints, it is recommended to reduce the stock speed acceleration to 6000mm/s and the max print speed to 350mm/s. This usually only increases long complex print speeds by a matter of minutes. Anything with simple designs will be fine at this speed.
Changing the time
Please just ignore the time fault on the speeder clock, it is irrelevant to the operations of the speeder pad which uses the local time for the web interface.
Shutdown Process
You must not just use the off switch to turn off the printer.
From the home screen, press configuration > system > system shutdown > confirm.
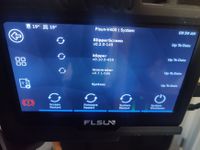
When the screen has gone black, give it 30 seconds then switch off the main switch on the left of the machine behind the base of the front left column where the plug enters the printer.
Emergency Stop
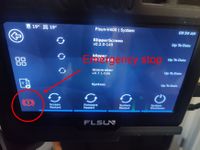
The v400 has an emergency stop 'button' on the display which will stop it suddenly and kill Klipper. You can use this to stop the printer quickly if you spot a serious problem. It is not an 'error message' Nick.
Klipper Interface
You can upload GCODE files to the printer using the Klipper Interface from a machine connected to the Hackspace network.
Maintainers
- Tim Neobard
- Steve Tong
Please note, we only support Cura 5.x - if you want to use a different slicer, we cannot offer support. Sorry! Though you're welcome to become a maintainer who does...
Printing ASA or ABS
ASA or ABS printing requires a higher surface temperature, but this risks the curie point of the magnetic bed.
- Ensure you have completed the induction and your CURA profile (or similar) includes the correct settings for the HEPA Filter to enable safe printing.
- Please do not attempt to print higher than 95'C
- Do not remove the magnetic bed until it has cooled completely.
- Do not leave ASA or ABS in the printer, please replace with a standard reel of PLA and purge the nozzle once your print is complete.
Please report any damage to the magnetic bed to discord.
PID tuning
The printer is PID tuned to 210'c print head and 60'c bed. This is the standard PLA print settings which are the most used settings by the hackspace.
If you are struggling with ASA/ABS we may need to retune to 295'c and 95'c however please try without first as it involves editing the firmware of the printer which is beyond the scope of this wiki page at present.
Autolevelling
Autolevelling requires the installation of the autolevelling probe.
This is not something that needs to be done routinely as the bed is not adjustable, however if you are getting poor adhesion with standard PLA, then you may need to rerun this.
Please note, when the bed needs to be autolevelled, it means the Z offset may also be incorrect. Setting the Z offset incorrectly could damage the printer. Damage to the magnetic bed is expensive, so if you have any doubts let us know. The following procedure should be done by those who are competent to do so.
Autolevelling procedure:
- Message the 3D print discord that you are running this process (We may need to double check the settings)
- Heat the bed to 60'C (Temperature > Heater bed > set temp > type 60, press tick)
- Allow to "soak" for 5-10 minutes. (Allow to come to temp, THEN go make a cup of tea)
- Goto configuration > bed level > bed mesh
- Attach the autolevelling sensor to the print head (it is magnetic)
- Attach the sensor lead into the white port at the top of the printer
- Click continue on speeder pad
- Allow the machine to run the auto level procedure
- Detatch the autolevelling sensor from the top of the printer very carefully!
- Remove the sensor from the bottom of the print head (it is magnetic)
Whilst the bed is hot, you will most likely also need to update the Z offset.
- Place a piece of thin paper on the print bed.
- Goto configuration > bed level > move Z0
- Adjust the head so that the paper is slightly gripping.
- Press top left back button when it is at the correct height.
Check your next print, if it is not adhering, you may need to adjust the head slightly further down (use the 0.05 measurement until you are happy)
v400 Community
For additional profiles & advice you can join the v400 community below:
Cura Profile 5.x Install Instructions
Download the following file:
https://drive.google.com/file/d/11JbcBx69SSi3piii1x1SFIQIUNgIOFHv/view?usp=share_link
Extract and follow the following instructions
1. Place the "flsun_v400 folder" in the "share\cura\resources\quality" directory under the cura5.x installation path.
2. Place the "flsun_v400.def.json" file to "share\cura\resources\definitions" directory in the installation path.
3. Place the "flsun_v400_extruder_0.def.json" file in the "share\cura\resources\extruders" directory in the installation path.
4. Place the "flsun_v400. stl" file under the "share\cura\resources\meshes" directory in the installation path.
5. Close all open CURA software and add V400 after opening it again.
Speeder pad firmware
The speeder pad runs FLSun forked firmware. Please do not "upgrade" this to official Klipper as this will require more changes in the slicer settings related to reading stored autolevelling mesh.
Restoring Dirty/Invalid packages
Goto Configuration > system to check the packages on the speeder pad.
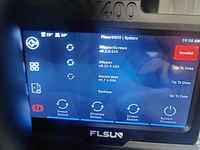
If you click on the Dirty or Invalid packages, recover "soft" first.
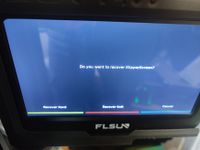
The pad will show a config screen with a "finish" button in the corner - ignore this and do not press it. The text may scroll for some time.
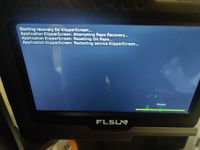

When it is complete, it will return to the home screen.
Profiles
Known good profiles, tested on Cura (5.2.1)
PETG: https://drive.google.com/file/d/17MrZKO8HQ9m1hasTZspd3uB7yUJjxcOJ/view?usp=sharing
PLA: https://drive.google.com/file/d/1vvfEeXpEavoDVzoWUcETAlr1yxPsmVb-/view?usp=share_link
TPU: https://drive.google.com/file/d/1KaKYprFIrm2kWPjQyJVNFyV1FO2kh9o0/view?usp=sharing
