Galvo Laser
More actions
About
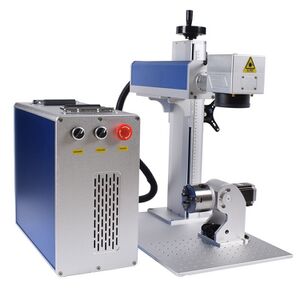
The space has purchased a 100w JPT MOPA (Master Oscillator Power Amplifier) Galvo (galvanometer scanner) Laser. Galvo lasers can engrave and cut metals.
A galvo can cut 10 to 65 times faster than a flatbed laser. Depending on the position within the marking field, however, the beam impacts onto the material at a greater or lesser angle of inclination. In the case of thicker materials, this slope of the cutting edge is clearly visible.
The MOPA function allows a lot more control and can on metals such as stainless, "engrave" in colour. In reality this is just localised heating to produce heat marks, but it's pretty cool.
Our existing lightburn agreement covers the pro version of the software, so both lasers can be used with Lightburn, however there are significant differences in setup, specifically because of the difference in boards.
You MUST have an induction to use this device.
Do not bypass any of the interlocks or safety devices
The laser is kept in the 3D print lab in a full enclosure. It cannot be used without an induction and there are safety interlocks on the enclosure to prevent eye damage.
Galvos
Galvo lasers use galvanometer scanners (what gives the Galvo laser its name) to direct the laser beam quickly and precisely across the material. Instead of moving the entire laser head, small mirrors (galvanometers) rapidly adjust the direction of the laser beam. The marking field size is defined by the deflection angle and the focal length of the optics.
Danger Will Robinson!
This laser can and will take your eyesight. Even the £300 safety goggles you can buy only afford you 10 seconds of protection. Next to the lathe, the Galvo Laser is one of the most dangerous tools in the hackspace. You cannot use this without induction
Inductions
It is suggested to start with Laser Everything's Galvo Crash Course. You should not use your own laptop on the machine because it requires calibration with the software based interlocks.
Laser Everything's Galvo Crash Course
https://youtube.com/playlist?list=PLoBR3k35202Yjc1yMfPZsY8EDh_pmcaa2&si=nRVl7qXiDLy2w2_l
The rest of the induction will only cover the safety aspects of using our specific machine at present.
Accessories
There is a rotory table with the laser
The bed takes M6 threaded bolts for 3D printed jigs and the like.
Machine Settings
The proposed space for the machine to live is in the CO2 laser room. It needs to be wheeled to the metal workshop and connected to the extractor as metal fumes are not good to breathe in.
Do not use the machine or operate the fan between 10pm and 8am.
| Unit | Parameter |
|---|---|
| Product Model | YDFLP-E2-100-M7-M-R |
| M² | <1.6 |
| Delivery Cable Length | 3 m |
| Nominal Average Output Power | >100 W |
| Maximum Pulse Energy | 1.5 mJ |
| Pulse Repetition Rate Range | 1 ~ 4000 kHz |
| Pulse Duration | 2 ~ 500 ns |
| Output Power Stability | <5% |
| Cooling Method | Air Cooled |
| Supply DC Voltage (VDC) | 24 V |
| Power Supply | <440 W |
| Environmental Supply Current | >18 A |
| Central Emission Wavelength | 1064 nm |
| Emission Bandwidth @3dB | <15 nm |
| Polarization Orientation | Random |
| Anti-high Reflection | Yes |
| Output Beam Diameter | 7±0.5 mm |
| Output Power Tuning Range | 0 ~ 100% |
| Operation Temperature | 0 ~ 40°C |
| Storage Temperature | -10 ~ 60°C |
| N.W | 8.5 KG |
| Size (L×W×H) | 336 × 255 × 90 mm |
| Pulse width (ns) | Down power frequency (kHz) |
|---|---|
| 1 | CW |
| 2 | 2960 |
| 4 | 2160 |
| 6 | 1400 |
| 9 | 960 |
| 13 | 580 |
| 20 | 400 |
| 30 | 300 |
| 35 | 250 |
| 40 | 210 |
| 60 | 195 |
| 80 | 190 |
| 100 | 180 |
| 150 | 90 |
| 200 | 75 |
| 250 | 70 |
| 300 | 67 |
| 350 | 67 |
| 500 | 67 |
To understand the above table, if you want a deep pass into material, you use a high Pulse Width of 500ns. If you use 67Hz cut off frequency, you are getting 100% of 100w (assuming your power is set to 100%). The power is linear. Setting it to 60hz will get you 90w (90% of 100w). You can set the laser upto 500Hz You will not get more power than 100w from a 100w source.
If you want to clean an object, you want a lower pulse width and a higher frequency.
When adding in speed to the mix, the length of time will proportionately heat the material up, leading to warping.
The frequency tables for this laser source can be found here: https://docs.google.com/spreadsheets/d/1_vJ6y7NVDa0yFTj_blUPmcuBIUijzCdA/edit?usp=sharing&ouid=107192365368469692263&rtpof=true&sd=true though be aware these are yet to be confirmed by JPT for an E2 source, the frequencies are from an E source file.
Lightburn has the ability to produce material test sheets based on two options. The below worked, but only because the laser is cleverer than the operator. There is no 15ns on this laser, so it has defaulted to 13ns to not break the laser. The 100% power frequency would be 680Hz not 125Hz, some 80% less power. Therefore despite this being "60% power" on the keyring, only 12w of power (12% of the laser) is actually being used. This is important because whilst it's possible to use these settings, it's difficult to consistently reproduce them. The correct settings for this test file (which should produce the same result) should be 13ns / 680Hz / 12% Power and the speed/Interval are what produce the pretty colours.

This is important to know because you could now experiment to increase the speed and lower the power to get faster results without damaging the laser.
Colour settings video
Inside the control box
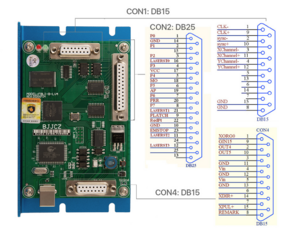
The control board for the Galvo is a BJJCZ / FBLI-B-LV4 board.
It has three connections, CON1, CON2 and CON4.
CON4 is connected to the foot pedal and contains the supply (in our case, seemingly on pin 4. Pin 5 provides VCC to the galvo head stepper.
The door interlock for the FBLI-B-LV4 board is set in software. Details on how to setup lightburn to do this can be found here. https://docs.lightburnsoftware.com/legacy/galvo/ConfigureGalvoSettings#field
It should be noted that when setting in software, pin 9 does not refer to "9" in software, but 15. You therefore need to set the "Start Marking" to none and the "Door Protect" to 15 if your pedal input is connected to GIN15.
If this is confusing, it is because it is.
The door interlock is an interlock of last resort as it is a software interlock. Do not rely on the interlocks, use the e-stop provided if you need to stop the job quickly and cannot press the stop button on the screen. By using the e-stop, you may not be able to restart the job in exactly the same place as all power to the machine is interrupted.
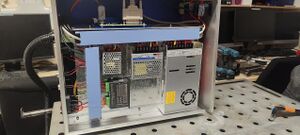
Inside the control box you can see the three power supplies which include the sino power supply for the head, a meanwell 24v for the laser supply and a generic 5v supply for the control board. The black box is the stepper controller for the mirrors in the galvo head.
Top right is the backside of the control switches (Power to laser, power to galvo head, e-stop)
At the rear of the case are three inputs. From top is the rotary accessory, 2nd is the interlock (was foot pedal) and the switched 240v power input.
nb. if the unit can be switched off at the rear.
The large black fixed output cable contains the galvo control, power and fiber optic cable. Be careful bending it.
Lightburn Setup
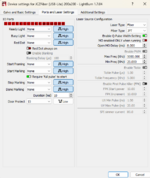
n.b. Do not install lightburn on your PC without a trainer in attendance. This is because the interlocks must be set correctly on your software as it sets the behaviour to the board after each cut. If in doubt, use the laptop attached to the machine.
The excellent tutorial by laser everything has all the setup steps required to setup lightburn on your own PC.
https://www.youtube.com/watch?v=9e2dHOaqfU0
See the notes under the above section on the control box in regards to setting the interlock. An image is provided to the right that are the settings that should be used and tested.
The cfg file mentioned in the initial setup is stored below:
https://drive.google.com/file/d/1nTMxVSCWoDjw9N40qOsycNOD6mVSil3Q/view?usp=sharing
Engraving Metal - Tutorial
Depending on your material, design size and lens, it will require different settings.
To provide a tutorial, we are assuming you are using a 2.3mm brass coin with a 200x200mm lens.
This tutorial concentrates on utilising AI tools and techniques to generate 3D files. If you can design in 3D, you can skip to the lightburn portion.
Generating an image
I use midjourney to make my files. It is a paid service, which costs about £10 a month. You can use what you like.
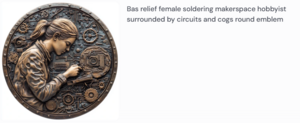
The important part is crafting a prompt which will provide a good 3D looking image to be able to engrave.
The prompt used is "bas relief female soldering makerspace hobbyist surrounded by circuits and cogs round emblem" the important bit is "bas relief" for the 3D and "round emblem" for a coin. Unfortunately specifying female (if that's what you want) is required as sexism is alive and well in the AI world.
Once you have the coin design, you will need to make it 3D.
Creating a depth map
I use sculptOK* to generate the depth map. Pressing "draw" will generate 4 varying depth and detail images.

The clearest image is not always the best.

On this image above because of the level of detail, the 3D preview will give you an idea whether this is a good image to engrave
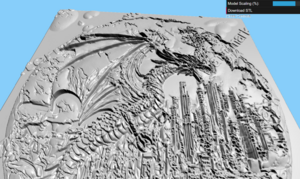
This 3D preview above shows the actual view of the most detailed version - there is no clear definition and the design is very broken
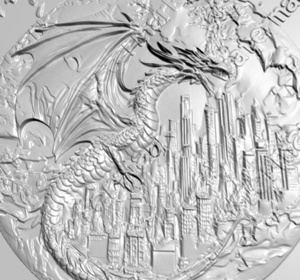
This 3D image is much more 3D, but it is using a much less detailed version of the photo.
Once you've chosen your depth map, you can now move onto importing it into lightburn.
*This link provides 50 free credits to the author
Lightburn
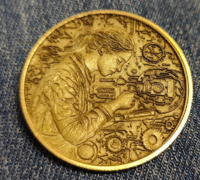
For the majority of brass engraving, good settings are:
Speed 2,000
interval 0.0250 (this defaults at 0.1 but this is not a good resolution for images)
250 pulse width
70 frequency.
"3D Slicer" setting for the image.
The B&W image has a depth pass of 256 greyscale points, therefore it is ideal to do 256 passes. This will take about 1.5 hours. For the below, we limited this to 150 passes and it took about 50 minutes. You will lose some depth and resolution when doing less passes.
Colour
Only a couple of materials - specifically stainless steel and titanium - will engrave in colour. It is a tempering process.
Colour is complicated. It relies on the type, makeup of material and thickness. Do not expect to use other peoples settings.
This video from MakrTheory shows you how to use the lightburn material test feature. This makes the process much easier. His laser is a 30w MOPA. Ours is 100w and ours is a different type of laser source. Do not expect to use his power settings.
