6090 ManTech Laser: Difference between revisions
More actions
m →Tested: Add Slate |
|||
| (35 intermediate revisions by 6 users not shown) | |||
| Line 1: | Line 1: | ||
==General Info== | ==General Info== | ||
[[File:ManTechLaserCutter.jpg|thumb|right|The 6090 ManTech Laser cutter]] | |||
The 6090 ManTech Laser was bought in 2020 as a crowdfunded response to COVID-19 to produce face shields for the NHS. It produced around 4,500 at a rate of 400 per day. | The 6090 ManTech Laser was bought in 2020 as a crowdfunded response to COVID-19 to produce face shields for the NHS. It produced around 4,500 at a rate of 400 per day. | ||
| Line 12: | Line 13: | ||
* Y-Axis rotational mount | * Y-Axis rotational mount | ||
* RUIDA 644XG Controller | * RUIDA 644XG Controller | ||
* Lightburn Camera - for placement and drawing scanning | |||
==Using== | ==Using== | ||
You must be inducted on this machine. | |||
Do not change mirror alignments or fiddle with the main tube. | |||
The laser has a number of safety cut outs which prevent the laser working in the event a user tries to use the machine without the necessary protections in place. | The laser has a number of safety cut outs which prevent the laser working in the event a user tries to use the machine without the necessary protections in place. | ||
* Please ensure the CW- | * Never use the power over 90% | ||
* Both extractor and air assist must be on to prevent damage to the lens. Tip: If it's not | * Please ensure the CW-5000 cooler is on and is showing a temperature less than 25°C and above 12°C | ||
* Both extractor and air assist must be on to prevent damage to the lens. Tip: If it's not noisy in the laser room, they're probably off. | |||
* Please leave the laser bed clean and clear. | * Please leave the laser bed clean and clear. | ||
* If something doesn't seem right turn it off using the keys and stick the Out of Service label on it (this is much preferable to damaging the machine unintentionally) | * If something doesn't seem right turn it off using the keys and stick the Out of Service label on it (this is much preferable to damaging the machine unintentionally) | ||
| Line 24: | Line 32: | ||
Steps for operation. | Steps for operation. | ||
#) Turn large switch on front of machine on (not top of lid) | |||
#) ensure "fan / air pump" switch is turned clockwise | #) ensure "fan / air pump" switch is turned clockwise | ||
#) ensure CW- | #) ensure CW-5000 is on and temperature is less than 25°C and above 12°C | ||
#) ensure emergency button is not depressed | #) ensure emergency button is not depressed | ||
#) | #) ensure "panel" is on by turning the main key. The screen will light up. | ||
#) press the "on" button | #) press the "on" button immediately. | ||
Laser will now centre to the top right (home). | Laser will now centre to the top right (home). | ||
| Line 35: | Line 43: | ||
To move the origin, use the arrows to where you want the origin to be and press "origin". | To move the origin, use the arrows to where you want the origin to be and press "origin". | ||
To move the Z axis, press the button in the centre of the arrow keys | To move the Z axis, press the button in the centre of the arrow keys (press Z/U). The menu will present and use the enter button to select the Z option. Now use the left/right arrows to adjust the height of the Z. Optimal cutting of the laser which is a 50.6mm focal lens is 6mm from the bottom of the air assist cone. There are small plastic templates around which allow you align the laser to 6mm from the workpiece. | ||
Stick money into the box when done - it's £5ph (roughly £1.25 for 15 minutes) but we don't give change. | |||
DO NOT CUT UNKNOWN MATERIALS IN THE LASER. Ideally buy materials from known laser suppliers like Kitronic, this is because ablating materials often gives off toxic fumes like Chlorine which are bad for you and very bad for metals in the laser. | |||
==Rotational Y-Axis== | ==Rotational Y-Axis== | ||
[[File:Rotational Axis.jpg|thumb|none]] | |||
When using the rotational axis you must first remove the honeycomb bed and lower the Z-Axis below the laser head. | |||
Ensure the device is square(ish) on the bed and the cable is not caught underneath between the slats and the base of the axis device. | |||
Place your item on the axis and adjust the height to ensure the material is 6mm from the laser head horizontally. The laser will only run in the X axis direction and the Y will rotate the bottle back and forwards. | |||
[[File:Plug and switch.jpg|thumb|none]] | |||
Insert the plug carefully - do not force it, it will only fit one way into the socket. | |||
[[File:Y-axis switch.jpg|thumb|none]] | |||
Flick the switch to the down position despite it having "on" on both up and down positions. When you are done, make sure you return the Y switch back to the central position. | |||
You will now need to modify lightburn to work on the rotational axis. | |||
[[File:Rotary Axis Menu.png|thumb|none|Rotary Axis Menu]] | |||
In lightburn, the Rotary axis is now under Laser Tools > Rotary Axis. However in older versions it is under Tools > Rotary Axis. | |||
[[File:Rotary setup.png|thumb|none]] | |||
Change the settings for the "roller", tick the "enable". | |||
The roller diameter is 80mm. You will need to put in your own devices diameter - an ikea flip top bottle is 70mm. The circumference will automatically update. You will have to guess at the steps per rotation. It is suggested you start at 3,000 steps per rotation and adjust until the object does one full rotation. Use a piece of tape to check it is doing a full rotation. | |||
Previous versions of lightburn does not save the settings, so pressing the test button does not test the settings you have changed. It is recommended to hit the OK button once you've made your changes, then go back into the menu and press "test". The Y axis should rotate. Do not do this with a bottle/glass on it until you're sure it's rotating at the right speed. The default 10,000 made our bottle shoot off the device. | |||
Once you're ready, you will need to use the correct settings for engraving. We do not recommend you exceed 150mm/sec. | |||
[[File:Bottle engraving.jpg|thumb|none]] | |||
A good engraving speed for glass is 150mm at 12% power. | |||
==Software== | ==Software== | ||
There is a computer with a Licenced version of LightBurn. Lightburn has an offer with East Essex Hackspace to provide | There is a computer with a Licenced version of LightBurn. Lightburn has an offer with East Essex Hackspace to provide Pro based licences for DSP and Galvo at 75% off for an additional £47 (that's the exchange rate at time of writing!) per licence. This code is only for hackspace members AND is linked to our mantech laser - using it on other lasers is not possible. You can also get a free 30d trial version of lightburn from lightburns website. This will enable you to setup a project before turning up to use the laser. | ||
If there is a queue, please do not use the laser computer to design your project. | If there is a queue, please do not use the laser computer to design your project. | ||
If you'd like to learn how to use lightburn, check out the tutorials here: | |||
https://lightburnsoftware.com/pages/tutorials | |||
==Camera== | |||
We have installed a 5mpix camera on the laser which allows advanced functionality. You can see the placement material and match up your design significantly more easily using this method. The calibration for large bed lasers is not perfect (we have noted about a 2-4mm discrepency over the length of the bed, but it's easier than using the standard framing tool. | |||
It can also scan in designs you have hand drawn, which you can then clean up on the software and then repeatidly cut. | |||
To setup the software you need to follow the instructions below. | |||
Please note the camera is a "lightburn camera". It is a 120° 5MP camera during setup. You should not need to do the lens calibration but you will need to calibrate the workspace. So for the below link, you only need to work from "Aligning the Camera and Workspace" step onwards once you've added the camera to the software. | |||
https://lightburnsoftware.github.io/NewDocs/UsingACamera.html | |||
We recommend using a piece of card to do the alignment on, using the speed 100ms at 10 power. You will likely need to adjust the brightness and exposure to be able to clearly see the alignment points. If you are unsure, ask a laser trainer to do this on your behalf at a time of their convenience - it is not necessary to use the laser cutter itself, just for extra functionality. | |||
==Materials== | ==Materials== | ||
The laser will cut non metal and non chlorine based products. | The laser will cut non metal and non chlorine based products. | ||
=== Tested === | |||
{| class="wikitable" | |||
|+ | |||
|'''Material'''||'''Operation'''||'''Material Thickness''' | |||
|'''Engrave Depth'''||'''Speed (mm/sec)'''||'''Power'''||'''Notes''' | |||
|- | |||
|Acrylic||Cut||5mm | |||
| ||10||90||Lovely smell... | |||
|- | |||
|Balsa | |||
|Cut | |||
|3mm | |||
| | |||
|60 | |||
|30 | |||
|Test first, Balsa cuts like butter | |||
|- | |||
|Balsa | |||
|Engrave | |||
|3mm | |||
|0.2mm | |||
|350 | |||
|25 | |||
|Test first | |||
|- | |||
|Delrin||Cut||10mm | |||
| ||2.5||90||Will reseal round cut. Can need to be pushed out. | |||
|- | |||
|Delrin||Engrave|| | |||
|???||80||40||Depth suitable for leather stamping | |||
|- | |||
|Fluted Polypropylene | |||
|Cut | |||
|4mm | |||
| | |||
|20 | |||
|40 | |||
|AKA Correx/That stuff estate agent signs are made from | |||
|- | |||
|Laser Birch Ply||Cut||2mm | |||
| ||25||45|| | |||
|- | |||
|Laser Birch Ply||Engrave|| | |||
|2mm||100||12|| | |||
|- | |||
|Laser Birch Ply||Cut||3mm | |||
| ||25||55|| | |||
|- | |||
|Laser Birch Ply||Cut||6mm | |||
| ||8||40|| | |||
|- | |||
|Laser Birch Ply||Engrave|| | |||
|3mm||90||12|| | |||
|- | |||
|Mylar||Cut||190 micron | |||
| ||100||20|| | |||
|- | |||
|Polypropylene||Cut||0.5mm | |||
| ||40||37|| | |||
|- | |||
|Polypropylene||Engrave|| | |||
|???||90||11|| | |||
|- | |||
|Teflon/PTFE Sheet | |||
|Cut | |||
|0.8mm | |||
| | |||
|250 | |||
|8 | |||
|Crisp Cut | |||
|- | |||
|Teflon/PTFE Sheet | |||
|Engrave | |||
| | |||
|??? | |||
|450 | |||
|7 | |||
|This is for gluing sheets together | |||
|- | |||
|Vegtan Leather||Cut||2.5mm | |||
| ||10||60||Will need covering with masking tape to prevent damaging surface. | |||
|- | |||
|Vegtan Leather||Engrave|| | |||
|???||100||15||Will need covering with masking tape to prevent damaging surface. | |||
|- | |||
|Slate | |||
|Engrave | |||
| | |||
| | |||
|30 | |||
|40 | |||
| | |||
|} | |||
=== Mantech Suggestions === | |||
There's a useful [https://mantechmachinery.co.uk/laser-cutter-parameters/ calculator] on the Mantech website. | |||
{| class="wikitable" | {| class="wikitable" | ||
|+ | |||
|'''Material''' | |||
|'''Operation''' | |||
|'''Material Thickness''' | |||
|'''Engrave Depth''' | |||
|'''Speed (mm/sec)''' | |||
|'''Power''' | |||
|- | |- | ||
| | |Acrylic | ||
|Cut | |||
|3mm | |||
| | |||
|21.5 | |||
|55 | |||
|- | |- | ||
| | |Acrylic | ||
|Cut | |||
|3mm | |||
| | |||
|17.5 | |||
|60 | |||
|- | |- | ||
| | |Acrylic | ||
|Cut | |||
|5mm | |||
| | |||
|12.5 | |||
|65 | |||
|- | |- | ||
| | |Acrylic | ||
|Cut | |||
|8mm | |||
| | |||
|10 | |||
|70 | |||
|- | |- | ||
| | |Acrylic | ||
|Cut | |||
|10mm | |||
| | |||
|6.5 | |||
|75 | |||
|- | |- | ||
| | |Wood | ||
|Cut | |||
|2mm | |||
| | |||
|18.5 | |||
|60 | |||
|- | |- | ||
| | |Wood | ||
|Cut | |||
|3mm | |||
| | |||
|15 | |||
|65 | |||
|- | |- | ||
| | |Wood | ||
|Cut | |||
|5mm | |||
| | |||
|12.5 | |||
|70 | |||
|- | |- | ||
| | |Wood | ||
|Cut | |||
|6mm | |||
| | |||
|10 | |||
|75 | |||
|- | |||
|Wood | |||
|Cut | |||
|9mm | |||
| | |||
|6.5 | |||
|80 | |||
|- | |||
|Laminate | |||
|Cut | |||
|2mm | |||
| | |||
|30 | |||
|55 | |||
|- | |||
|Laminate | |||
|Cut | |||
|3mm | |||
| | |||
|25 | |||
|60 | |||
|} | |} | ||
== Lightburn Material Libraries == | |||
[[File:Lightburn Material Library.png|thumb|Lightburn Material Library]] | |||
==== Importing ==== | |||
* Download one or both of the files below and extract the clb files from the zip. These libraries are loaded every time Lightburn is loaded so place these files in a location that will be kept (i.e. not your Downloads folder). | |||
* In Lightburn click the 'Material Library' tab bottom right pane. | |||
* Click the 'Load' button and browse to where you extracted these files and open. | |||
* Once loaded you will see them listed in the top dropdown. | |||
==== Using ==== | |||
* Select the layer from the 'Cuts/Layers' pane top right. | |||
* To use a profile expand the tree until you get to one with an icon (empty polygon is 'Cut', filled is 'Fill') | |||
* Left click the profile then click the 'Assign' button, this copies the library setting to the selected layer. You can also use the 'Link' button, this will ensure that any future changes to the entry in the Material Library is auto synced to the layer. | |||
==== Adding New Entries ==== | |||
* Setup a layer in the 'Cuts/Layers' pane top right. | |||
* Click the 'Create new from layer' button in the 'Materials Library' pane bottom right. | |||
* Fill in the material name, thickness if cutting, title and description. | |||
* Click 'Ok' | |||
==== Profiles ==== | |||
===== Tested - EEH - Mantech 6090 80w ===== | |||
[[Special:Redirect/file/Tested - EEH - Mantech 6090 80w.zip|Tested - EEH - Mantech 6090 80w.zip]] | |||
Settings for the Mantech 6090 80w laser that have been tested on the hackspace laser. | |||
===== Mantech 6090 80w ===== | |||
[[Special:Redirect/file/Mantech 6090 80w.zip|Mantech 6090 80w.zip]] | |||
Settings for the Mantech 6090 80w laser from the Mantech calculator. | |||
== BANNED MATERIALS == | |||
This is not a comprehensive list! | |||
{| class="wikitable" | |||
|+ | |||
|'''Material Type''' || '''Notes''' | |||
|- | |||
|Vinyl || Produces Chlorine gas (Not good for you or laser) | |||
|- | |||
|Chrome tan leather || Produces Cyanide Gas (Not good for you) | |||
|- | |||
|Food stuffs || Causes unnecessary clean up | |||
|- | |||
|PVC || Produces Chlorine gas (Not good for you or laser) | |||
|- | |||
|Non-Laser Ply/MDF || Glues may contain Formaldehyde | |||
|} | |||
For more info on Laser ply: | |||
https://kitronik.co.uk/blogs/resources/what-is-laser-plywood-laserply | |||
https://kitronik.co.uk/blogs/resources/plywood-glue-types-classifications | |||
[[Category:Infrastructure]] | [[Category:Infrastructure]] | ||
Latest revision as of 20:49, 14 November 2025
General Info
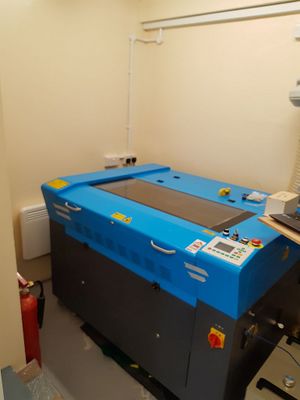
The 6090 ManTech Laser was bought in 2020 as a crowdfunded response to COVID-19 to produce face shields for the NHS. It produced around 4,500 at a rate of 400 per day.
Specs
- 600x900 bed
- 80w CO2 Tube
- CW-3000 passive cooler.
- 720m3 6" Systemair RVK Extraction Fan
- Air Assist
- Motorised Z Axis (30cm depth)
- Y-Axis rotational mount
- RUIDA 644XG Controller
- Lightburn Camera - for placement and drawing scanning
Using
You must be inducted on this machine.
Do not change mirror alignments or fiddle with the main tube.
The laser has a number of safety cut outs which prevent the laser working in the event a user tries to use the machine without the necessary protections in place.
- Never use the power over 90%
- Please ensure the CW-5000 cooler is on and is showing a temperature less than 25°C and above 12°C
- Both extractor and air assist must be on to prevent damage to the lens. Tip: If it's not noisy in the laser room, they're probably off.
- Please leave the laser bed clean and clear.
- If something doesn't seem right turn it off using the keys and stick the Out of Service label on it (this is much preferable to damaging the machine unintentionally)
Steps for operation.
- ) Turn large switch on front of machine on (not top of lid)
- ) ensure "fan / air pump" switch is turned clockwise
- ) ensure CW-5000 is on and temperature is less than 25°C and above 12°C
- ) ensure emergency button is not depressed
- ) ensure "panel" is on by turning the main key. The screen will light up.
- ) press the "on" button immediately.
Laser will now centre to the top right (home).
To move the origin, use the arrows to where you want the origin to be and press "origin".
To move the Z axis, press the button in the centre of the arrow keys (press Z/U). The menu will present and use the enter button to select the Z option. Now use the left/right arrows to adjust the height of the Z. Optimal cutting of the laser which is a 50.6mm focal lens is 6mm from the bottom of the air assist cone. There are small plastic templates around which allow you align the laser to 6mm from the workpiece.
Stick money into the box when done - it's £5ph (roughly £1.25 for 15 minutes) but we don't give change.
DO NOT CUT UNKNOWN MATERIALS IN THE LASER. Ideally buy materials from known laser suppliers like Kitronic, this is because ablating materials often gives off toxic fumes like Chlorine which are bad for you and very bad for metals in the laser.
Rotational Y-Axis
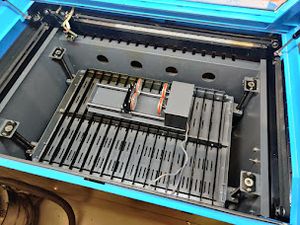
When using the rotational axis you must first remove the honeycomb bed and lower the Z-Axis below the laser head.
Ensure the device is square(ish) on the bed and the cable is not caught underneath between the slats and the base of the axis device.
Place your item on the axis and adjust the height to ensure the material is 6mm from the laser head horizontally. The laser will only run in the X axis direction and the Y will rotate the bottle back and forwards.
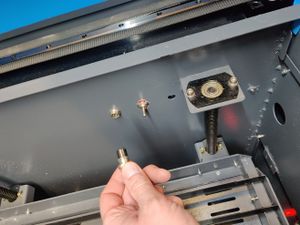
Insert the plug carefully - do not force it, it will only fit one way into the socket.
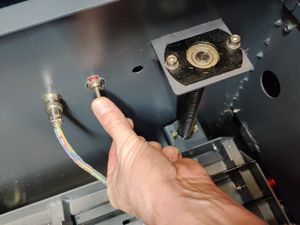
Flick the switch to the down position despite it having "on" on both up and down positions. When you are done, make sure you return the Y switch back to the central position.
You will now need to modify lightburn to work on the rotational axis.
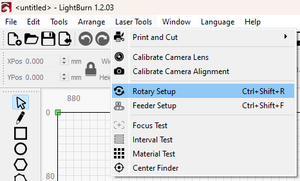
In lightburn, the Rotary axis is now under Laser Tools > Rotary Axis. However in older versions it is under Tools > Rotary Axis.
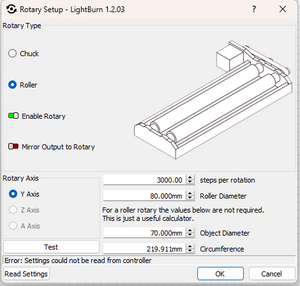
Change the settings for the "roller", tick the "enable".
The roller diameter is 80mm. You will need to put in your own devices diameter - an ikea flip top bottle is 70mm. The circumference will automatically update. You will have to guess at the steps per rotation. It is suggested you start at 3,000 steps per rotation and adjust until the object does one full rotation. Use a piece of tape to check it is doing a full rotation.
Previous versions of lightburn does not save the settings, so pressing the test button does not test the settings you have changed. It is recommended to hit the OK button once you've made your changes, then go back into the menu and press "test". The Y axis should rotate. Do not do this with a bottle/glass on it until you're sure it's rotating at the right speed. The default 10,000 made our bottle shoot off the device.
Once you're ready, you will need to use the correct settings for engraving. We do not recommend you exceed 150mm/sec.
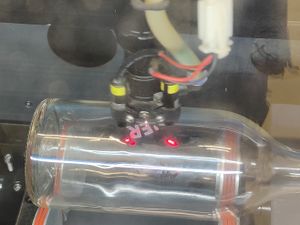
A good engraving speed for glass is 150mm at 12% power.
Software
There is a computer with a Licenced version of LightBurn. Lightburn has an offer with East Essex Hackspace to provide Pro based licences for DSP and Galvo at 75% off for an additional £47 (that's the exchange rate at time of writing!) per licence. This code is only for hackspace members AND is linked to our mantech laser - using it on other lasers is not possible. You can also get a free 30d trial version of lightburn from lightburns website. This will enable you to setup a project before turning up to use the laser.
If there is a queue, please do not use the laser computer to design your project.
If you'd like to learn how to use lightburn, check out the tutorials here:
Camera
We have installed a 5mpix camera on the laser which allows advanced functionality. You can see the placement material and match up your design significantly more easily using this method. The calibration for large bed lasers is not perfect (we have noted about a 2-4mm discrepency over the length of the bed, but it's easier than using the standard framing tool.
It can also scan in designs you have hand drawn, which you can then clean up on the software and then repeatidly cut.
To setup the software you need to follow the instructions below.
Please note the camera is a "lightburn camera". It is a 120° 5MP camera during setup. You should not need to do the lens calibration but you will need to calibrate the workspace. So for the below link, you only need to work from "Aligning the Camera and Workspace" step onwards once you've added the camera to the software.
https://lightburnsoftware.github.io/NewDocs/UsingACamera.html
We recommend using a piece of card to do the alignment on, using the speed 100ms at 10 power. You will likely need to adjust the brightness and exposure to be able to clearly see the alignment points. If you are unsure, ask a laser trainer to do this on your behalf at a time of their convenience - it is not necessary to use the laser cutter itself, just for extra functionality.
Materials
The laser will cut non metal and non chlorine based products.
Tested
| Material | Operation | Material Thickness | Engrave Depth | Speed (mm/sec) | Power | Notes |
| Acrylic | Cut | 5mm | 10 | 90 | Lovely smell... | |
| Balsa | Cut | 3mm | 60 | 30 | Test first, Balsa cuts like butter | |
| Balsa | Engrave | 3mm | 0.2mm | 350 | 25 | Test first |
| Delrin | Cut | 10mm | 2.5 | 90 | Will reseal round cut. Can need to be pushed out. | |
| Delrin | Engrave | ??? | 80 | 40 | Depth suitable for leather stamping | |
| Fluted Polypropylene | Cut | 4mm | 20 | 40 | AKA Correx/That stuff estate agent signs are made from | |
| Laser Birch Ply | Cut | 2mm | 25 | 45 | ||
| Laser Birch Ply | Engrave | 2mm | 100 | 12 | ||
| Laser Birch Ply | Cut | 3mm | 25 | 55 | ||
| Laser Birch Ply | Cut | 6mm | 8 | 40 | ||
| Laser Birch Ply | Engrave | 3mm | 90 | 12 | ||
| Mylar | Cut | 190 micron | 100 | 20 | ||
| Polypropylene | Cut | 0.5mm | 40 | 37 | ||
| Polypropylene | Engrave | ??? | 90 | 11 | ||
| Teflon/PTFE Sheet | Cut | 0.8mm | 250 | 8 | Crisp Cut | |
| Teflon/PTFE Sheet | Engrave | ??? | 450 | 7 | This is for gluing sheets together | |
| Vegtan Leather | Cut | 2.5mm | 10 | 60 | Will need covering with masking tape to prevent damaging surface. | |
| Vegtan Leather | Engrave | ??? | 100 | 15 | Will need covering with masking tape to prevent damaging surface. | |
| Slate | Engrave | 30 | 40 |
Mantech Suggestions
There's a useful calculator on the Mantech website.
| Material | Operation | Material Thickness | Engrave Depth | Speed (mm/sec) | Power |
| Acrylic | Cut | 3mm | 21.5 | 55 | |
| Acrylic | Cut | 3mm | 17.5 | 60 | |
| Acrylic | Cut | 5mm | 12.5 | 65 | |
| Acrylic | Cut | 8mm | 10 | 70 | |
| Acrylic | Cut | 10mm | 6.5 | 75 | |
| Wood | Cut | 2mm | 18.5 | 60 | |
| Wood | Cut | 3mm | 15 | 65 | |
| Wood | Cut | 5mm | 12.5 | 70 | |
| Wood | Cut | 6mm | 10 | 75 | |
| Wood | Cut | 9mm | 6.5 | 80 | |
| Laminate | Cut | 2mm | 30 | 55 | |
| Laminate | Cut | 3mm | 25 | 60 |
Lightburn Material Libraries
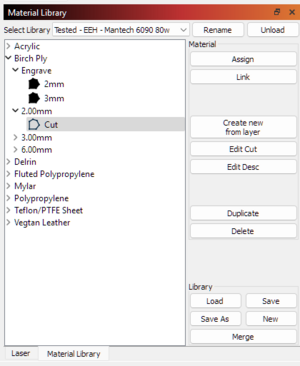
Importing
- Download one or both of the files below and extract the clb files from the zip. These libraries are loaded every time Lightburn is loaded so place these files in a location that will be kept (i.e. not your Downloads folder).
- In Lightburn click the 'Material Library' tab bottom right pane.
- Click the 'Load' button and browse to where you extracted these files and open.
- Once loaded you will see them listed in the top dropdown.
Using
- Select the layer from the 'Cuts/Layers' pane top right.
- To use a profile expand the tree until you get to one with an icon (empty polygon is 'Cut', filled is 'Fill')
- Left click the profile then click the 'Assign' button, this copies the library setting to the selected layer. You can also use the 'Link' button, this will ensure that any future changes to the entry in the Material Library is auto synced to the layer.
Adding New Entries
- Setup a layer in the 'Cuts/Layers' pane top right.
- Click the 'Create new from layer' button in the 'Materials Library' pane bottom right.
- Fill in the material name, thickness if cutting, title and description.
- Click 'Ok'
Profiles
Tested - EEH - Mantech 6090 80w
Tested - EEH - Mantech 6090 80w.zip
Settings for the Mantech 6090 80w laser that have been tested on the hackspace laser.
Mantech 6090 80w
Settings for the Mantech 6090 80w laser from the Mantech calculator.
BANNED MATERIALS
This is not a comprehensive list!
| Material Type | Notes |
| Vinyl | Produces Chlorine gas (Not good for you or laser) |
| Chrome tan leather | Produces Cyanide Gas (Not good for you) |
| Food stuffs | Causes unnecessary clean up |
| PVC | Produces Chlorine gas (Not good for you or laser) |
| Non-Laser Ply/MDF | Glues may contain Formaldehyde |
For more info on Laser ply: https://kitronik.co.uk/blogs/resources/what-is-laser-plywood-laserply https://kitronik.co.uk/blogs/resources/plywood-glue-types-classifications
