Maslow: Difference between revisions
More actions
NCMReynolds (talk | contribs) |
|||
| (10 intermediate revisions by 3 users not shown) | |||
| Line 17: | Line 17: | ||
* Spiral upcut bit fitted as default | * Spiral upcut bit fitted as default | ||
* Bosch POF 1200 AE 650w Router | * Bosch POF 1200 AE 650w Router | ||
* Collets: 6mm, 8mm & 1/4" | |||
==Software== | ==Software== | ||
| Line 22: | Line 23: | ||
There is a large community of Maslow users on the Internet and you can find information and ideas for using the in the [http://maslowcommunitygarden.org/ Maslow Community Garden]. | There is a large community of Maslow users on the Internet and you can find information and ideas for using the in the [http://maslowcommunitygarden.org/ Maslow Community Garden]. | ||
There is a Fusion360 post processor for the Maslow at https://cam.autodesk.com/hsmposts?p=maslowcnc | |||
==Switching the Maslow CNC on and off== | ==Switching the Maslow CNC on and off== | ||
| Line 67: | Line 70: | ||
This licence allows you to work remotely but won't generate GCODE files directly. You need to take the project file to the computer in the PC Lab nearest the door and export a GCODE file (.nc) from there. | This licence allows you to work remotely but won't generate GCODE files directly. You need to take the project file to the computer in the PC Lab nearest the door and export a GCODE file (.nc) from there. | ||
Instructions for [[preparing files for the Maslow with VCarve Pro]] are on their own page. | |||
==Uploading your file to WebControl== | ==Uploading your file to WebControl== | ||
| Line 76: | Line 81: | ||
==Putting material on the Maslow== | ==Putting material on the Maslow== | ||
Full sheets require a 2 man lift, ensuring you lift the Maslow sled if required. There is a very small lip which will support the base of the material, but you need to screw the top of the material to the base sheet. | |||
==Fitting a router bit and setting the Z height== | ==Fitting a router bit and setting the Z height== | ||
To fit a router bit, you need a 19mm spanner and one of the three collets we have for the Maslow. | |||
* 6mm | |||
* 8mm | |||
* 1/4" | |||
First move the Z axis to 0 (this is different to setting Z to 0!). This ensures that you are not over/under extending the router bit when changing it. | |||
Ensure the router is off/unplugged. | |||
Press the large red flat button to engage the spindle lock, use the 19mm spanner to loosen the collet. | |||
If you are swapping out cutters (Same size for same size) then just fit the new one. | |||
If you are changing the entire collet, you will need to unscrew it completely. When the cutter is loose, remove this first, then continue until you can turn the collet with your fingers. Ensure the collect goes back into the maslow box. | |||
Put the new collet on and do it up to finger tightness. Fit the cutter, undo a little if you need to. If you leave the cutter slightly proud and loose, when you put the maslow flat against the cutting surface, this will put it in the Z=0 position. Tighten carefully by holding the red button and tightening up clockwise. | |||
If the spindle will not go flush, you need to access webcontrol Z axis control panel. Use webcontrol to raise the spindle up (or down) until Z is flush and press the set Z at 0 button. | |||
==Dust extraction== | ==Dust extraction== | ||
| Line 85: | Line 109: | ||
==Starting the cut== | ==Starting the cut== | ||
Ensure Z is at 0 and the collet is tight & both locks are engaged on the wedges underneath the maslow frame. | |||
Ensure the chains are not wrapped,are on both motors at the top of the maslow and the guides & weights aren't tangled. | |||
Ensure the maslow is roughly in the middle of the sheet. | |||
- Check your design | |||
- Turn on the vacuum | |||
- Turn on the spindle | |||
- Press Start | |||
==Feed rates, plunge depths and so on== | ==Feed rates, plunge depths and so on== | ||
Max XY movement speed 600mm/min | |||
Max XY Size 2440mm x 1220mm. Mileage may vary at the edges of the sheet. | |||
Max Z movement speed 300mm/min | |||
Z Axis +5mm (max) and -15mm (max - or min if the fancy takes you) | |||
==Topics to Expand== | ==Topics to Expand== | ||
| Line 104: | Line 140: | ||
Tim Neobard | Tim Neobard | ||
Nick Reynolds | Nick Reynolds | ||
Steve Ford | |||
[[Category:Infrastructure]] | [[Category:Infrastructure]] | ||
Latest revision as of 15:10, 6 March 2023
About
Funded in 2019 by RDCs Mental Health Fund
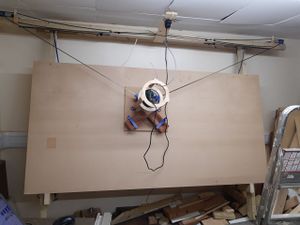
Maslow is a large (4'x8') CNC cutting machine designed to let you cut big, useful things out of wood and other flat materials.
MaslowCNC - originating site MakerMade - Supplier of EEH Maslow
We've tried to make the Maslow relatively easy to get on with, but like all CNC machines there is a degree of learning involved before you can expect good results. Bear in mind that large cuts can take several hours to complete and while in use the room will be very noisy and also quite dusty.
Specs
- 8'x4' Bed
- 45mm max cut depth
- Spiral upcut bit fitted as default
- Bosch POF 1200 AE 650w Router
- Collets: 6mm, 8mm & 1/4"
Software
The Raspberry Pi that controls the Maslow CNC runs WebControl.
There is a large community of Maslow users on the Internet and you can find information and ideas for using the in the Maslow Community Garden.
There is a Fusion360 post processor for the Maslow at https://cam.autodesk.com/hsmposts?p=maslowcnc
Switching the Maslow CNC on and off
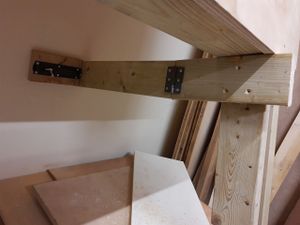
Before you switch anything on, the Maslow must be pulled forward so that the cutting bed is at an angle. The whole thing is hinged at the top, pull it out and swing the props back so they hold it in place. You should use the bolts to make sure they can't move. See the picture on the right.
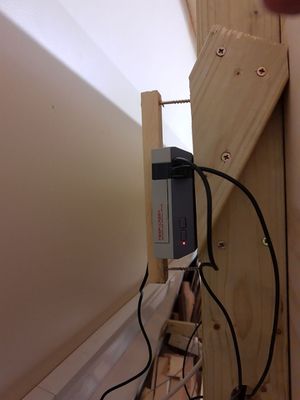
Once it's pulled forward, you should be able to see a Raspberry Pi computer in a NES style case fixed on the left hand side behind the cutting board. Push the on/off button (the bottom one) and it will switch on the rest of the Maslow CNC with a relay.
It will take a few minutes for the Raspberry Pi to start. Once it is ready, the WebControl interface for the Maslow CNC is available from any computer connected to Hackspace WiFi.
Once you are done with the Maslow CNC, you must shut it down by pushing the on/off button on the front of the Raspberry Pi case again. This will shut the Raspberry Pi down properly and disconnect power to the rest of the Maslow CNC. DO NOT SHUT IT DOWN BY JUST SWITCHING THE POWER OFF AT THE WALL. If you you do this it may corrupt the software on the Raspberry Pi and make the Maslow CNC unusable for the next person. Which might be you.
Connecting to WebControl
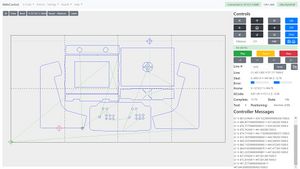
The Raspberry Pi that controls the Maslow CNC runs WebControl. This allows you to control the machine and upload prepared GCODE files for cutting. You can't print straight from normal drawing files like SVG or DXF, you will need to prepare them first.
Nonetheless it's worth connecting to WebControl straight away and familiarising yourself with the web interface before you upload a file. As this is an insecure internal web interface you need to click through any warnings your browser may show and insist you wish to connect. There is no password to the Maslow and more than one person/computer can connect to it at a time.
If the interface is too large to show on your screen, which happens on some lower resolution laptops, zoom out a little (CTRL- usually) until it does.
Don't change any of the settings
Really we mean it, don't change any of the settings.
Really we mean it, don't change any of the settings.
Really we mean it, don't change any of the settings.
Make sure the Maslow is calibrated before you start
To check that the Maslow knows where the cutting sled currently is, press TBC in WebControl then TBC. The sled should move to the very middle of the waste board over the big X we've drawn on it to make clear where home is by default.
If this does not happen, contact a maintainer on Discord for advice. Please don't try and recalibrate the Maslow yourself. It's kind of a two person job and involves working at height to access the chain motors.
Preparing a file with Easel (Online, multi-platform)
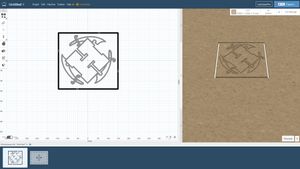
You can't cut directly in WebControl from an image or drawing file. There is an online CAM (computer-aided manufacturing) tool called Easel which can generate the GCODE necessary without installing anything on your computer for most simple pieces of work. Easel supports the Maslow and can output suitable GCODE files.
You will need to register yourself for a free account with Easel.
Easel has a nice preview of how it expects your work to look, supports automatically adding 'tabs' to support the workpiece during cutting and gives you an estimate of the time the cut will take. This estimate can be quite wrong, allow up to 50% more time than it estimates.
Instructions for preparing files for the Maslow with Easel are on their own page.
Preparing a file with VCarve Pro (Windows)
To use VCarve, you will need to install a Makerspace version of VCarve on your own computer then register it as a 'client' of the main Hackspace licence. See VCarve Pro Makerspace Edition for how to licence this. Do not just search for VCarve Pro, the usual download will not take the Makerspace ID to allow you to register it.
This licence allows you to work remotely but won't generate GCODE files directly. You need to take the project file to the computer in the PC Lab nearest the door and export a GCODE file (.nc) from there.
Instructions for preparing files for the Maslow with VCarve Pro are on their own page.
Uploading your file to WebControl
TBC
- What files are supported
- How to get it on there
- How to move it around
- What if it doesn't fit?
Putting material on the Maslow
Full sheets require a 2 man lift, ensuring you lift the Maslow sled if required. There is a very small lip which will support the base of the material, but you need to screw the top of the material to the base sheet.
Fitting a router bit and setting the Z height
To fit a router bit, you need a 19mm spanner and one of the three collets we have for the Maslow.
- 6mm
- 8mm
- 1/4"
First move the Z axis to 0 (this is different to setting Z to 0!). This ensures that you are not over/under extending the router bit when changing it.
Ensure the router is off/unplugged.
Press the large red flat button to engage the spindle lock, use the 19mm spanner to loosen the collet.
If you are swapping out cutters (Same size for same size) then just fit the new one.
If you are changing the entire collet, you will need to unscrew it completely. When the cutter is loose, remove this first, then continue until you can turn the collet with your fingers. Ensure the collect goes back into the maslow box.
Put the new collet on and do it up to finger tightness. Fit the cutter, undo a little if you need to. If you leave the cutter slightly proud and loose, when you put the maslow flat against the cutting surface, this will put it in the Z=0 position. Tighten carefully by holding the red button and tightening up clockwise.
If the spindle will not go flush, you need to access webcontrol Z axis control panel. Use webcontrol to raise the spindle up (or down) until Z is flush and press the set Z at 0 button.
Dust extraction
The Maslow generates a large amount of dust, like most CNC woodworking machines. You must connect a dust extractor to the outlet on the sled before cutting and also run the high level dust extractor in the room. Even this won't collect all the dust the Maslow generates, you need to brush down and sweep the around around it after you are done.
Starting the cut
Ensure Z is at 0 and the collet is tight & both locks are engaged on the wedges underneath the maslow frame.
Ensure the chains are not wrapped,are on both motors at the top of the maslow and the guides & weights aren't tangled.
Ensure the maslow is roughly in the middle of the sheet.
- Check your design - Turn on the vacuum - Turn on the spindle - Press Start
Feed rates, plunge depths and so on
Max XY movement speed 600mm/min Max XY Size 2440mm x 1220mm. Mileage may vary at the edges of the sheet. Max Z movement speed 300mm/min Z Axis +5mm (max) and -15mm (max - or min if the fancy takes you)
Topics to Expand
- router bits
- how to check the calibration of the machine before use
- how to recalibrate the machine: X & Y, and Z after bit change
- tips on routing
- tips on material
- tips on attachment to the wasteboard
- how to handle dust
- z-axis control
- reflashing the pi upon dr
Maintainers
Tim Neobard Nick Reynolds Steve Ford
